

As I begin then process of the CNC Router build, I am going into new areas that I haven’t had much experience in. A big example is metals. While it is possible to build much of the machine from wood, and there are many good examples of CNC machines out there, for best rigidity going with metal is the best way to go. Obviously the rails and ball screws are steal, but other components are going to be made from aluminum. Part of what goes into coming up with a design to build this machine is researching materials, and more importantly the cost of these materials. This has involved considerable research, from Google searches to eBay. It really pays to do this, as one site may have a component for one price, and another for 50% less. For example, I will need two lengths of angle aluminum. After doing searches on the web, eBay, and a few other metal vendors, I have found the best price, after shipping, is 80/20.
While the materials is an important component, getting the right measurements is critical. As I mentioned in my first post, I already bought the rails and ball screws, along with the bearing guides, mounts, and other parts. During the process of attaching the ball screws to the mounts, I discovered that one wouldn’t go on. In my effort to work on this, I decided to remove the nut from the screw. BIG mistake. The reason they call these ball screws isn’t because the threads are rounded. They are rounded so that ball bearings can travel inside of them. I did not discover this until I had the nut partially off, and ball bearings started coming out. I quickly grabbed a magnetic bowl to collect the bearings. After some advice from Jason, watching a couple YouTube videos, and about 2 frustrating hours, I was able to get successfully get the nut repacked. Needless to say, I will not be making that mistake again! Once I got the burs filed off, I finally was able to get the ball screw rods assembled, and I got my measurements, and recorded them in OneNote. I go over this a bit in the video I posted as well.
I am utilizing OneNote considerably for this project. As I mentioned, I am reaching out to new areas where I am finding that there is a LOT of information to digest. Simply put, I can’t keep track of it all in my head. So I am doing a lot of documenting along the way, including everything from measurements to tracking my orders, to how much I have been spending, all kept in a OneNote notebook.
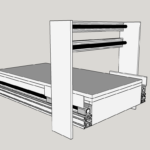
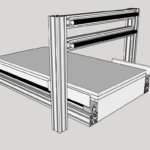
I have begun designing the machine in SketchUp. The 3D Warehouse is absolutely invaluable for this. All the the rails components are in there, which has allowed me to work on an accurate as possible design. I am looking at using some 80/20 components. They have all their profiles in various CAD formats, including SketchUp, available for download. On top of that SketchUp does a GREAT job of going between metric and imperial measurements. At this point, I have the main platform designed, as well as most of the gantry. My next update will go in to my next steps of the design.