A few updates and tool gloats

Published on by Mike  (2 Comments)

Hey All, I know its been a long time since I have put an update to the blog.  The good news is things have been happening, I just haven’t been very proactive at updating the blog.  I do have part 2 of the Technology in the Shop article nearly complete, just needs some final touches.  If you would like to see more articles like that from me, please leave feedback on what you would like to see.

2012-12-06 20.48.432012-12-15 19.31.48
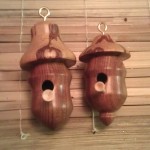
Despite the lack of updates, I have been busy in the shop, largely spending time at the lathe turning Christmas ornaments for family and friends.  This year I tried turning miniature acorn bird houses.  These were a lot of fun to turn!  I am also participating in another challenge from the chatroom on The Woodwhisperer.com website.  This time it is a box.  I will update the blog once it has been completed.  The hand tool cabinet hasn’t changed much since its last post, that may have to wait till Spring before I work on it again.

2012-11-08 18.17.16
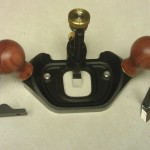
Finally, a couple tool gloats.  First back in November, I went to the Woodworking in America show near Cincinnati.  While I took advantage of a number of good deals, my main purchase was a Veritas Router Plane.  I must say, it is a very well made hand plane, and I will likely be buying the smaller blades for it as well.


2012-12-25 18.14.47
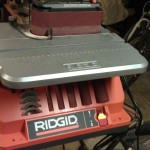
The second gloat, is for Christmas my family got me the Ridgid Oscillating Sander.  This thing is great is at doubles both a spindle and belt sander, and really excels at smoothing cuts from the bandsaw, both inside and outside curves.

I will try to do a bit better with getting blog posts up.  One thing that helps motivate me to do more blog posts is feedback!  Let me know what you think!

A bright turning – A Table Lamp

Published on by Mike  (Leave a comment)

The lamp is yet another turning as my lathe addiction grows.  🙂  This was a challenging, but fun project.  There are actually three turnings total for this project.  The first is the main body, the next one is the base, and finally a small turning that is used to attach the electrical components.  All components were made from maple that has some (but not much) ambrosia figure in it.  The finish is boiled linseed oil and a furniture paste wax.

The lamp’s main body was made for four 3/4″ boards laminated together.  The two middle boards had a groove routed down the middle of them stopping an inch from each end.  The idea being that after turning the main body, that I could drill a hole from either end that would allow the wire to run through, and attach the electrical components.  The BIG mistake I made was I didn’t mark on the boards where the grooves were so that I could see where they were.  I just assumed they would stay center enough for this.  However, after glueing up the four boards, then jointing the edges, as well as trimming the ends, some how those groves became off center.  Not enough to ruin the final turning, but just enough that they weren’t useable.  Luckily  I was able to find a drill bit that I already had that was long enough to meet in the middle, and was able to finish the drilling on the drill press.

The base of the lamp was turned from a rough 4/4 piece of maple.  I flattened it on one face with the jointer, then straightened one edge.  I wasn’t concern about squaring up the piece, just so I had a good edge to cut it to length on the miter saw and attach to the face plate.  I roughed out the round pattern on the bandsaw.  Once on the lathe, it was no problem getting the piece perfectly round and getting the face opposite to the faceplate parallel.  Since this was a flat piece, with grain running perpendicular to the lathe, using spindle gouges was out of the question.  The only turning tool I was able to use for this was my scraper.  The main body had a large tenon, so I drilled mortise into the the base to accept the main body.  Then I drilled a hole through the side of the base to allow for the electrical wire.

The hole at the top (and bottom for that matter) of the lamp body was 5/8″ in diameter.  I needed a reducer peg so that I could put a threaded nipple into it.  So I turned one to 5/8″ then drilled a hole just over a 3/8″ in diameter.  The 5/8″ main hole was big enough to allow the nut and washer to fit, so it made attaching the threaded nipple a breeze.  Before I glued in the reducer peg I attached the nipple to it.  I SHOULD have ran the electrical wire through it first, as it would have been much easier to get pushed through.  I didn’t but after a bit of rigging, I was able to get the wire pulled through.

The electrical components were for the most part were taken from an old lamp that was falling apart, though I had to buy a couple pieces from Lowes.  The lampshade was bought from Target.

My wife is delighted to have it now.  The room we have it was always a dark room because of the large brick wall for the fireplace.  Having the additional light in the room makes a big difference for the overall lighting in the room.


Snowman – A Christmas Turning

Published on by Mike  (Leave a comment)

So the latest in my tool addiction is my lathe.  As an update, when I went to the woodworking in America show, I got a really good deal on the Delta lathe I had been looking at.  Since then I have been turning like mad.  My first project was a set of screwdrivers, which will be the subject of a future post.  The latest turning I have completed is this snowman.  Actually this is the second attempt actually, the first one turned out okay, but it took a little bit of imagination to see it as a snowman.  So I started out again.  First thing is I wanted some actual features (buttons, eyes, nose, mouth, etc.) on this one.  So the first thing I did was took some scrap Brazilian cherry and started turning it into pegs.  Several 1/4″ round and a bunch 3/8″ round.  In the maple blank, I laid out each segment of the snowman, including the tenons which will loosely fit into the next section.  I then laid out the position for each eye, mouth dot, and button, and drilled them out on the drill press.  From there I glued in the pegs, and let them sit so that they were good and dry.  From there, I cut each section of the blank free, and then knocked the corners off with the band saw.

The turning of each section was the same.  First mounted the top of the blank to the faceplate, and the rough rounded the blank.  I then drilled out about 1/2″ deep hole that I proceeded to further hollow out to size and shape, to both accept the tenon from the lower segment, and to fit on the jaws of my Nova chuck.  From there, I rounded the piece again  to make sure the piece was balanced, form the tenon, then form the shape of the segment.  I used my skew chisels to make the segment as rounded as possible.  I hollowed out each section with 1.5″ inch forstner bit.  Since I don’t have any hollowing tools yet, that is the furthest I went with it, but there is still some room for some small pieces of candy or other small items.  Finally each segment was sanded smooth.

The finish on the main body is simply shellac.  I wanted to keep the wood as light as possible (its supposed to resemble snow after all!) so I didn’t put any oil on it.  The hat I stained.  I wish I hadn’t.  If I make one of these again, I will get a dark wood for the hat that I can use oil and shellac to finish.

While the stain was drying, I decided to have some more fun.  I turned the pipe from two pieces.  This was a fairly challenging piece to turn since it was so small. The pipe was finished with boiled linseed oil and shellac.  Finally I turned the carrot nose.  The finish on this was orange marker.  🙂  After very carefully drilling the holes in the head segment for these, they were glued in place.

Overall, this was a fun and a challenging project that I have about 8-10 hours put into.  Some how I have a feeling this won’t be the last snowman I turn on the lathe.

Turning #6 – My Second Mallet

Published on by Mike  (Leave a comment)

I decided that after attempting to use the first mallet, I needed one that had a little bit of heft to it.  When looking at the prices on some of the mallets on the market that were comparable to what I was wanting to make, I decided it was worth it to use an exotic blank that was heavy.  In this case the mallet is made from a South African species known as Mopane.  This stuff was DENSE and HARD.  The blank was 3″x3″x12″, and easily weighed 3 pounds.  I bought two other blanks of the same size at the same time that were maple and cherry.  The mopane blank was heavier then those two combine!

For a newbie turner, the wood choice made this a challenging turn.  It forced me to get real good real quick at sharpening chisels as this wood was not at all forgiving with a dull chisel, and would rip out if the chisel needed sharpening.  My one regret is that I wish I had taken more time to try to smooth the head of the mallet and do a better job sanding.  There are some scratches on the head portion that didn’t become visible until I applied the finish.  Since this is a shop project, and the head is going to get abused anyway, I didn’t worry about it, and moved on.  The finish on it is, again, boiled linseed oil, with many coats of shellac sanded to 800 grit.  Overall, I am really happy with the piece, and have had two family members try to talk me out of using it for its intended purpose.  The final weigh-in for this mallet was just shy of 20 oz!

Turnings 3, 4, & 5 – Marking Knives

Published on by Mike  (2 Comments)

I am getting ready to take a class at my local Woodcraft to learn to how to make hand cut dovetails.  Most of the tool requirements listed I already owned.  One of the exceptions was a marking knife.  I decided to give it a try at making one.  I bought a couple pen blanks of Brazilian Cherry as I really liked how the finish came out on the hand plane tote and knob.  Alas the first attempt at the first knife ended in disaster.  When I went to drill the hole for the blade tang, the piece split all the way down.  Bummer!  So I started over, and once I got the handle turned, I drilled progressively larger until I got to the size hole needed.  After epoxying in the blade and playing around with it, I realized the blade was too short and way too wide to be practical for marking dovetail cut lines.  I decided to try again, but this time used some scrap cherry left over from the chisel rack.  This is a much narrower handle, for a much narrower and longer blade.  This should be much better suited for cutting dovetails.  The last one was made as I had made an experimental blade before doing anything for real.  Even the it is beveled for a lefty and I am right handed (oops) I decided to make one more handle for this one.

Also, I made the blades from a demolition reciprocating saw blade, which is about 1/16″ thick piece of metal.  I used my Dremel to cut the metal, and grind and belt sander to do the shaping and beveling.  I then sharpened them like I would any other blade.