 So work has progressed on the mantel clock. The next step after working on the corner posts was to start working on the panels. The grooves that I put into the corner posts were for 1/4″ thick panels. Since the rough stock I have laying around is all 4/4, it would have been extremely wasteful to plane a 4/4 piece down to a 1/4″ thick. So I decided to go for my first resaw. I started out by flattening one of the faceson the jointer, the flattened and brought the opposite face to parallel with the planer. This only took a couple passes on each machine, which left me with a little over 7/8″ thick material, which is plenty to work with. I then edge jointed one side, and cut the opposite on the table saw. The work piece was ready for the band saw. I would like to tell you that I used a 1/2″ or 3/4″ resaw blade on my band saw, but I didn’t. I didn’t even use a 3/8″ blade. In face I used the 1/4″ blade that was on the saw. While a thicker blade would have helped, it is more than possible to resaw with a 1/4″ blade. The important part is having the blade well tensioned and properly tracking. I set the rip fence on the band saw so that it got the work piece visually centered, no need for it to be exact at this stage. The work piece was about 5.5″ wide and about 24″ long. I then powered up the dust collector and band saw and started the cut. The push stick and push pad are a must for this operation! With the safety aspect in consideration, the next important thing, is let the saw work, and not try to push the work piece through too hard or fast. I was very happy with the results of the resaw, overall it went well. The next step was to take the now two work pieces back to the planer and smooth down the rough side for each work piece, and then while flip flopping the work pieces get them down to 1/4″. After getting them to thickness, I cut them to size on the table saw.
A quick note on movement. Wood this thin, especially after a resaw, will want to move, a LOT. At the end of each day in the shop, I put the work pieces under some weight. I am happy to report that this has done very well to keep the work pieces reasonably flat. There has been some movement, but nothing I cannot work with.
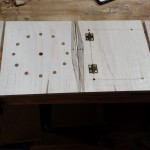
On the work piece I designated as front, I started laying out the clock face. Once I got the face layed out, I drilled a 1/4″ diameter hole roughly about an 1/8″ deep. I then turned pegs from the same cherry stock I made the columns from, and the glued them into the holes. While the glue was drying, the rear panel, I used my scroll saw to cut out a door for access to the clock works. I am not really happy with the cut, but I think I can work with it. I pre-installed the hinges for the door so that the spacing would be correct, before fully cutting out the door.
I still have some more work to do on the panels, and will add another update as I progress further.
