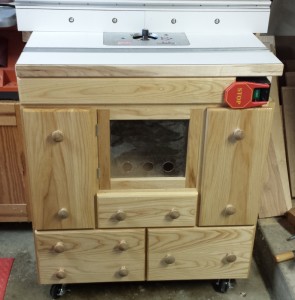
 Wow! This turned out to be the biggest and most complex project I have completed yet in my wood shop. And I would do it again in a heart beat! I looked back on my first post for the router table, where I had defined the goals I wanted to achieve for the new table. I am happy to say I have achieved them all! The router table truly is a joy to use!
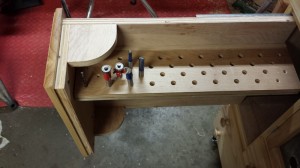
A couple quick things I wanted to highlight that I didn’t cover in previous posts. The first is the drawer pulls. ![]() I ended up turning all the pulls for the drawers. Each drawer has two pulls on it, and there are 6 drawers. If you ever want to good practice and replicating parts on a lathe, turn 12 pulls! There was some variation between each one, but over all they were each a good match with the rest. The other item I wanted to mention is the bit storage. For now I kept it simple just by taking a length of plywood, drill a bunch of 1/2″ and 1/4″ holes, and screwed it to one of the vertical drawers. With the setup I came up with for bit storage I will be able to change and rearrange it as my bit collection continues to evolve.
I ended up turning all the pulls for the drawers. Each drawer has two pulls on it, and there are 6 drawers. If you ever want to good practice and replicating parts on a lathe, turn 12 pulls! There was some variation between each one, but over all they were each a good match with the rest. The other item I wanted to mention is the bit storage. For now I kept it simple just by taking a length of plywood, drill a bunch of 1/2″ and 1/4″ holes, and screwed it to one of the vertical drawers. With the setup I came up with for bit storage I will be able to change and rearrange it as my bit collection continues to evolve.
 A quick note about the vertical drawers. I took a small risk and tried something different and unique with them. As of this post, I have actually been using the table for a couple of months, and I can honestly say I love the configuration. One drawer is designated for wrenches, collets, height adjuster, and various other components I use frequently. The other is for bit storage. Both provide very easy access to getting what I need, while keeping everything very organized.
Thank you all for following along! On to the next project!

Nice thing to hear. I’ve always been wanting to build a router table myself & your post inspired me so much. Thanks!
Great to hear! The table I built has been in use for almost a year now, and I still love using it. Good luck with your build!