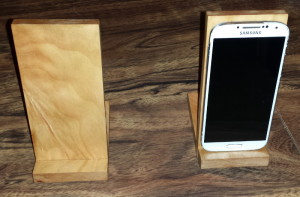
This phone stand is a very and easy project to make. I built the two stands from left over cherry from another project. This is a perfect use from some of that scrap you have lying around the shop! While I used my full complement of machines, this project can easily be built with a minimal set of tools. These design of these stands can easily be modified for any size phone or even a tablet. Have fun and enjoy!
Category: Articles
February 2015 Shop Update & Tool Gloats
Published on by Mike (Leave a comment)
We are about half way through winter, and that rodent saw its shadow, so we still have 6 more weeks of winter. The good news is that the winter so far has been mild, and I have been able to get some shop time! I have completed a couple small projects that I have completed, and they have been put on video! Keep your eye out here on the blog, or on my YouTube channel for when the video’s are released. I am not to a point where I can get a video out on a weekly basis, but I hope to get one or two out a month.
 One thing I need to do is apologize for the last video, the audio was horrible. The camera I have used for the first few videos was a small sports camera that has a microphone that isn’t very good. The next video coming out I was able to improve the audio level, and there won’t be background music while I am talking. However, the audio quality suffered a bit. The good news is, I bought a new video camera! I found one that didn’t break the bank but also has the ability to accept an external microphone, which will be a future purchase. I ran several test videos with it, and even without using external mics, the audio level is significantly better. I can even add back in the background music and voices will still be easily heard and understood!
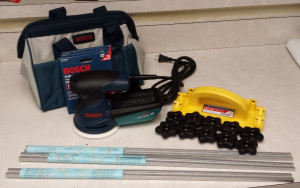 This past weekend I attended The Woodworking Show while it was in Columbus. As always, they have classes and seminars their, and those were pretty good. I was a little disappointed in the deals they had. I have actually found that most of the deals are actually priced the same as retail locations. Thanks to the power of mobile Internet, I researched each of my purchases to help determine if it was a good deal or not. Probably the best deal I got was a new Bosch Random Orbit Sander. The Bosch booth had an okay deal on it, but made it a great deal by also giving a Visa gift card right on the spot. Of course I activated that immediately and used it at the show! 😀 With that I bought another Grr-Rip Block. This one is #3 and will be used mainly at the router table, though it may find its way over to the band saw on occasion. I also bought several lengths of T-Track that will likely be used for a drill press table I am planning on making soon. I also bought some 1/4″ 20 star knobs.
That’s all I have for this month’s update. Until next month’s shop update!
Tool Gloat – Veritas MK II Honing Jig
Published on by Mike (Leave a comment)
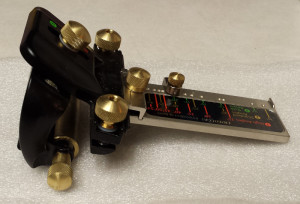 This past Christmas my kids gave me the Veritas MK II Honing Jig. My first reaction to this is, it rocks!
Years ago I bought an inexpensive honing jig and I never had much luck with it. I decided to forgo using it as I figured out that I was able to do a better job with free hand sharpening my chisels and plane blades. The results were okay, but often I felt that the edges were not as sharp as they could be. I had also noticed that a couple of the bigger chisels had a very slight skew that most likely was introduced by me not holding them down with equal pressure. I also really had no control over the bevel. While I worked to maintain the same bevel that was already established. I like having a micro-bevel on my blades and while it is possible to do this freehand, but it would always be at an inconsistent angle. Finally, I almost always walked away with my finger tips with very thin cuts, similar to paper cuts.
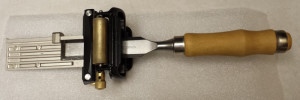 The honing jig from Veritas solves all the above frustrations I had with sharpening free hand. The jig includes a gauge that sets the distance the blade is exposed so that bevel angle is the same for every blade. The gauge is adjustable to a variety of angles that are commonly used. There are two thumb screws that once the blade is lined up are used to tighten the clamp that holds the blade in place. One thing that needs to be taken care of is that these thumb screws are providing equal pressure so as to not inadvertently introduce skew. Thank you to Roger T who pointed this out to me before I learned this the hard way! The jig also provides a switch on it that allows a quick and easy way to put a consistent micro-bevel on every blade. The wheel on the jig allows for very smooth operation allowing for a very consistent motion for sharpening. At first glance the jig looks complicated because of all the various adjustments it allows, but once everything is set, it is actually very quick and easy to use.
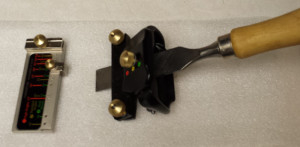 As a first go around with this jig, I sharpened my entire chisel set, 11 in all, ranging from an 1/8″ up to 1 1/2″ wide chisels. Each one got sharpened at a 1000 grit, 4000 grit, and finally an 8000 grit wet stone. I got through all 11 chisels fairly quickly. The edge that was produced is definitely superior to the edge I was creating going freehand. I will definitely be using this jig for sharpening all my hand tools from here on out!
Shop Update Jan 2015
Published on by Mike (Leave a comment)
 I hope everyone had a great holiday season, as well as a great New Year! I am hoping to have a new video and related blog post up in the next week or so. In the meantime I wanted to get out a quick shop update.
I am finally building the 3 drawers for my hand tool cabinet. Even though I am hand cutting half blind dovetails (a first for me) I thought this would be a quick project, and a great one for doing a video on. Overall, the video aspect has been working at well, as I have been editing as I have footage done. However, I have had a few set backs on this project that has not allowed it to go as quick as i had planned.
Set back #1. This project sent me to the ER. I was remaking one of the drawer sides and on one of the last cuts the saw slipped off the work piece and right into my finger. I was lucky in that all I needed was 5 stitches. It could have been far worse had it cut a tendon or nerves. Fortunately today all I have is a scar that is still healing, but otherwise full use. I have been thinking of ways to further address this injury, either in a video or a post, so keep your eye out for it. However I did loose 2 weeks of shop time.
Set back #2. I got sick. With the first set back, it put me into the holiday season. Fortunately I planned on taking two weeks off from work. The first week I planned on finishing my Christmas shopping and help where needed. The second week I planned on spending time in the shop to get the drawers done. I got one day in, then I got sick with the flu. I am feeling better now, just in time to go back to work!
Fortunately, I am close to finishing the drawers, so I am hoping to have them done fairly soon now! No more set backs!!! 😀 After the drawers are complete, I have been thinking through the next couple projects. I hope to get an update out on those soon.
On a personal note, I did make one New Year’s Resolution. I have given up drinking pop. At this point I have not had a drink of pop in a week. It was a challenging week as going through caffeine withdraw while sick is absolutely not fun. While it is a woodworking blog, I am going to use it to help keep me honest with keeping this resolution, so you may see an occasional update on this.
Until next time, go make something and stay safe!
Video 4 – Cleaning Up Round Overs on Inside Corners
Published on by Mike (Leave a comment)
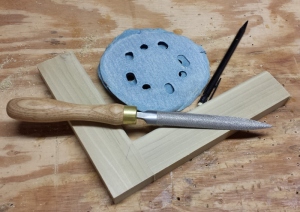 In any of our woodworking projects, there are many details that we pay close attention to. One that I do in every one of my projects is to take the time to clean-up round overs., especially on the inside corners. The issue is that the spinning bit is not able to make a clean corner. I like it to appear that the two sides forming the corner come together like a miter. To do this I use a rasp and sandpaper to clean up the corner. The end result results in very clean lines, no longer muddied up by the limitation of the router bit. Check out the above video where I demonstrate the technique I use to accomplish this.

