Spring is around the corner! Time to get back to Woodworking!

Published on by Mike  (Leave a comment)

too_much_snowI know I have been a bit lax on my posts this month.  As many of you have had as well, we have had a pretty severe winter.  Since my shop is heated only with a kerosene heater, there is a limit to how cold it can get before its not worth trying to warm the shop.  The last few winters we had plenty of warmer days that I could get the shop to a temperature that is comfortable enough to work in.  This winter, that has only happened a couple times, but not enough to do my usual winter skill-building project.  I still have that planned, just not certain when I will do it, as I have other projects planned now.  I will, of course, write about those as I start them.

penThe good news, all hasn’t been lost this winter.  I did get a couple warm days that I was able to go out and turn some pens.  This past weekend I did manage to get some shop time, and actually built a quick weekend project.  This will likely be discussed in another post at some point in the future.  What I can say is, I was suffering sever shop withdraw, and the weekend was a big help getting over that!

chidwick
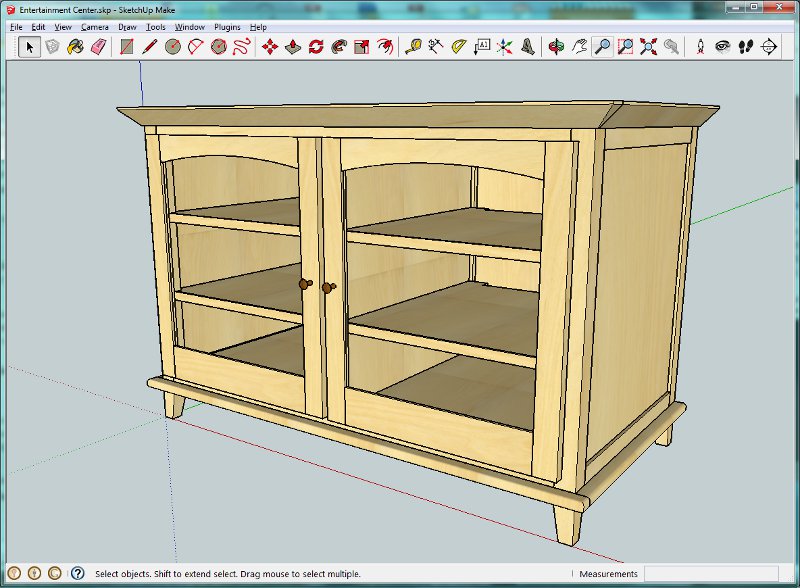
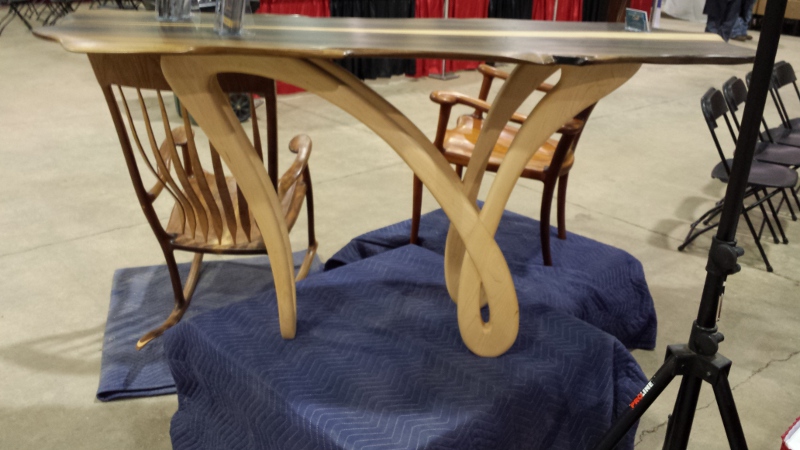
I did also attend the Woodworking Show when it made its round in Columbus.  The deals were decent, though I didn’t buy too much to gloat about.  I bought mainly stuff for the router and router table, including replacing my dulled straight bits, a new power switch, and few other odds and ends from the show.  Woodwerks of Columbus also had an event in conjunction with the show.  That is a great store, and I hope to get back up there sometime soon.  The picture of the table was taken at The Woodworking Show, and was made by Andy Chidwick.  I watched his presentations, and learned a lot about his techniques.  I hope to attempt some of these at some point.

The good news is, that as it is starting to get warmer, I will be spending more time in the shop, which means there will be more frequent updates to my blog

Get Woodworking Week 2014

Published on by Mike  (Leave a comment)

GWW14

snowOnce again Tom Iovino of TomsWorkBench.com is hosting Get Woodworking Week.  My shop, as many others, is in an unheated garage that I will warm with a space heater when I am ready to use.  Unfortunately it has been so cold this winter that I have only had a few days that it has been warm enough outside for the heater to be effective.

So what can we as woodworkers, suffering from severe shop withdraws, do about it?  Well, there are a few things we can do while not in the shop.

1.  Go shopping!  The woodworking shows are currently running their circuit, if you have one coming near you, go, as there are lots of good deals, as well as some good seminars to help you expand your woodworking horizons.  Also go to your local Woodcraft/Rockler/Any store that sells tools and start researching (and even make) any tool purchase you are considering.  This is also a good time to stock up on supplies and consumables.

2.  Take a class!  The classrooms are usually nice and warm, and you will most definitely learn some new techniques to help you become a stronger woodworker.

3.  Join a woodworking club!  This is a great way to get with your local woodworking community.  A lot of opportunity to speak with other like minded people and compare projects and notes.

su4.  Design and Plan your next projects!  In fact this is what I am doing now.  I typically use sketch-up to design most of my projects.  I often use this also as an opportunity to expand my sketch-up skills to do something new, as well as go through the various iterations of a project design until I get it to a point I am happy with it.  From there I am able to develop a cut-list which helps me determine the amount of material I need to buy.  I can then start budgeting for it so that when the shop is warm I can start making dust right away.

5. Too cold?  Never!  Sometimes the call of the shop is stronger that dislike of being cold.  Get out there anyway and start making saw dust.

So there you have it!  You have absolutely NO excuse to say its too cold to be woodworking.  There is plenty you can do even if you are not in your shop!

Technology in the Shop – Updated Wireless

Published on by Mike  (Leave a comment)

main_routerA discussion on home network infrastructure on a woodworking blog?  Why not?  🙂  I am tying this back to the Technology in the Shop series of articles that I wrote last year, and I believe this post could be beneficial to those who are wanting to do a similar setup that I have done.

Before I had the dedicated computer in the shop, I would carry my laptop out for the webcam, drawings, and such.  The router and access point for the house was on the extreme opposite end of the house, and I wouldn’t always get a good signal.  I ended up buying a WiFi extender.  While this would benefit me out in the shop, it would also benefit everyone else in the house by, in theory, decreasing some of the dead zones we had.  The result was a slight improvement.

wifi_extenderWhen I setup the permanent computer, which was an older machine, it seemed to experience more connectivity issues.  I added a newer 802.11N USB card on the laptop which helped some.  However, I still got frequent drops, which was especially annoying when I was trying to stream.  So much so that I don’t do it very often anymore.

The final straw was we got a Chromecast for Christmas.  It actually worked great, but what I found was that it would overwhelm the extender, and other devices on it would suffer.

new_routerI decided it was time to add a second access point on our network, and do away with the extender.  I was putting serious thought in running an ethernet cable through the walls and ceilings, which would be a pretty serious under taking.  Someone then recommended that I try ethernet over power first.  I had looked into this a few years ago, but it was an expensive solution that had varying degrees of success.  Based on the recommendation, I looked at it again, and the cost of these had come way down, and by reading the reviews, it seemed like they were very stable.

EoP_adapterSo I found an EoP option that was on sale, and bought a second wireless router.  A note on the router, while I couldn’t buy the exact model we have for our primary router, I bought one that had very similar specs.  In theory any two WiFi APs should work together, but it is a wise to get  the same brand and model when possible.  Once the EoP arrived, I hooked them up and configured the new router.  The first thing I did with the new router was turn off of the routing and DHCP functions on it.  After that I set the IP address and name of the router (not the SSID) to something different than first router.  I then setup the security and the SSID identical to that of the primary router, so that all of our devices would connect to it seamlessly.  I then disconnected the extender, plugged in the first end of the EoP to the primary router, and the receiving end to the new router.  I then ran a few tests to verify that the new connections were working.

For the devices  we have inside the house, we noticed the improvements almost immediately.  Even my wife and kids noticed improvements in the quality of their connections.  So much so that I suspect that the extender was causing a lot of unneeded network traffic that has now been eliminated.  Due to the extreme cold, I have not had a chance to test the shop computer with the new setup, but I am very optimistic that I will also see a significant improvement with that as well.

Dust Collection – Part 3

Published on by Mike  (Leave a comment)

hf_dcWith the table saw and jointer prepped, it was time to hook them up to the DC.  While it is always preferable to use rigid pipe for DC ducting, the distance were so short for each connection, I used flexible hose for ease of setup.  The table saw hook up is about 3 feet, from the DC, and perhaps 1.5 feet from the ground.  The jointer is about 6 feet from the DC.  The first run of hose was from the DC to the Y.  From the Y two runs went to the table saw and to the jointer.

y_hookupsAfter getting this setup, I ran some test cuts through the table saw and over the jointer.  I was impressed with the difference it made.  With the jointer, I had been using the small DC whenever I used it, but I found the new setup worked just as well clearing the chips and shavings away.  With the table saw, I saw the biggest improvement.  The biggest improvement was no dust hitting the floor under the saw.  Between the two, using the blast gates has proven effective at keeping the CFMs up at the machine being used.  One thing I have noticed is that if the blade isn’t completely buried in the blade I get a lot more dust on the top.  So the next modification I make will be some sort of blade guard attached to the DC.

dc_ts_jtrAs I previously stated, my dust collection setup will be something that will always be improved upon.  Besides the table saw upgrade, I have want to expand it to more.  The next be chip and dust generator is my router table.  I made it many years ago and has served me well, but it is grossly lacking in its dust collection ability.  I have been putting serious thought into build a new router table which will incorporate the connection to the large DC.  I also have an OSS that generates a lot of dust.  I want to get a better option setup for dust collection as well.

One thing I will say about the new dust collection setup, is it has cut my clean-up time in half, especially around the table saw.   The updates I made were long overdue!

Dust Collection – Part 2

Published on by Mike  (Leave a comment)

hf_dcSince the table saw and jointer rarely get moved, it made sense to do something a little more permanent for them for dust collection.  I decided it was best to add a second dust collector to my shop.  After doing a bit of research, and some craigslist searching in vain, I decided to give the large Harbor Freight dust collector a try.  While the quality for most of their power tools are questionable at best, the dust collector seems to be one of their gems, and it is very affordable.  Plus, everything it will connect to is no more than 10′ away from the machine, which means minimal ducting, resulting in less loss of CFMs.  For now my goal is getting the jointer and table saw hooked up.

I then went to the local woodcraft and bought the DC accessories I needed.  I bought a tray for the table saw, a new hook up for the jointer, 2 friction fit blast gates, a Y fitting, a flexible hose, and hose clamps.

ts_dcAfter getting the DC assembled and in its home right next to the table saw, I started working on modifying the table saw.  As my table saw is an old contractor style table saw, it had an open bottom.  The try itself was smaller than the opening so I had to close in the opening a bit.  I grabbed some scrap wood and made some support cleats that screwed into the bottom of the saw.  The tray was then able to sit on these cleats.  I secured the tray to the struts with a few screws.  Next came the blast gate.  The idea of the friction fit was so it was easy to remove when I needed to move something around.  The problem was it was too easy to remove and I later found that the force of the DC would often pull them off.  So I put the blast gate on as tight as it would go, then drove a couple screws into it to hold it in place.  I elected to keep the back open on the table saw

jointer_dcNext came setting up the jointer.  Being a new jointer (less than a year old at the time) it came with a standard 4″ connector for DC.  The friction fit blast gate didn’t fit it, so I bought a new connector and modified it to fit my jointer.  I attached its blast gate in a similar to the table saw.

The next and final post will discuss running the hose, testing the new setup, and what I plan for future enhancements to my dust collection setup.