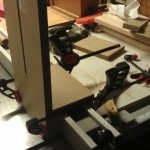
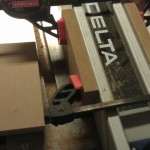
 As I mentioned in yesterdays post, the mystery project utilizes a bunch of tenons (8 total) but I didn’t have a tenon jig. So I decided to make one from MDF. To keep it simple, I made it so that it slides on the rip fence. I started out putting a couple blocks that were as tall as the fence it self and clamped them on to the fence. I put some paper between the blocks and the fence to keep it snug fence but hopefully allow for smooth movement. Once I got the blocks placed, I put a top on and glued and nailed it solid. I then took a long board that was wide as the slider is long and cut a groove down the center. This groove will allow for clamps to hold the work piece in place. This was glued and nailed to the slider. Now, in theory it should have been perfectly square to the table, however theory rarely pans out. 🙂 Luckily my fence allows for adjustment of that so that I can get the vertical board perfectly square to the table. After I got it all together, and provided a good snug fit. I will put a good coat of wax on the inside of it to get a smooth slide.
Mystery Project – Post 1
Published on by Mike (Leave a comment)
 Until the person receives this, I really cant say what it is yet. My blog is linked to Facebook and twittter and they or someone they know could see this. Anyway I made some further progress on it tonight. What I can say is that the project will compose of at least 2 panels using mortise and haunched tenon joinery. After milling the boards for the 2 panels, I ran a groove in the edges to accept the panel and the haunch of the tenons. I did two passes on the table saw flipping face against the fence so that groove will be perfectly centered. From there I started working on the mortises. Since I didn’t have a long enough router bit, I decided that the best way to do these was with the drill press, a forstner bit, and a few chisels. It took several hours to complete, but this evening I was able to complete 8 mortises. The next step will be to start working on the tenons. I don’t currently have a tenoning jig, so I will likely putting one together that runs over the fence to accomplish this. I will update my blog once I have one made.
Spring Cleaning and New Project
Published on by Mike (Leave a comment)
 Since we have the most crappy trash service in the world, to make up for it our city has a yearly bulk trash pick-up. Our day for this was this past Thursday (5/10/12). This year was probably our biggest pile we have had in many years. Most of the stuff that got taken to the curb had been in the garage in our “for bulk pickup” pile. Once the garage got cleaned out of all the trash, I set about doing some reorganzing and spring cleaning. It is amazing, beyond the sawdust (which there was a lot too) how much dirty and debris gets on a garage floor! It took a couple evening afterwards and most of the morning and afternoon today, but I finally got the garage spring cleaning done! I don’t think the area has ever looked as good as it does now!
Earlier this week I milled up some boards for a new project that I got started on today. I will give more details later on it, but it is intended as a gift for someone who may see this post on Facebook. I put the breadbox on hold for this one as it is a little time sensitive, but I plan on getting back to that one after I finish this new one. So keep your eye for future posts.
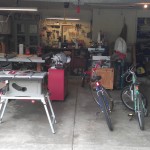
Also, as part of my spring cleaning and lightening my load effort, I have decided to finally get rid of my old (but newer?!?) table saw that I don’t use anymore. This is the smaller one pictured in the foreground. I use the table saw that is visible behind it exclusively. It is actually older then the new one, but it is also by far the better of the two. So that went up on to Craigslist today.
Breadbox Project
Published on by Mike (Leave a comment)
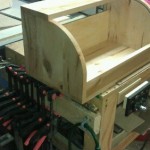
 As mentioned in my previous post, I am working on a breadbox for my wife. I will make more updates as it nears completion. Today I finished the sanding, and decided to go ahead and start putting the finish on the box even though I haven’t started the door yet. The wood is maple that has some ambrosia figure to it. I got a pretty good deal on it from crlumber.com as he was trying to close out his remaining stock, and the figure was a bit limited. I am seriously thinking about making a trip back to get a little bit of walnut, as I am think the contrast in wood will really make the whole project pop out. I will post more pictures directly to the blog at some point. However, I am posting progress pictures via twitter. I have setup a twitpic event gallery just for the bread box. Click here to check it out!!
Going Ons
Published on by Mike (Leave a comment)
Just wanted to make a quick update. I am currently working on a breadbox that my wife requested. This has been a winter project, which thanks to the mild winter I have gotten a more shop time then normal. I started the real work on it back mid-January and mostly have been working on it during the weekends. I will hopefully get a blog post up soon.
I have made a few updates to the blog itself. I have been using my twitter account a little more, and plan on posting pictures using twitpic. Check out the bar on the right, as it will display my most recent pictures and twitter posts. These may not always be woodworking related, but most will be. For example, there are pics posted of some house renovations that are going on, including a new roof, gutters and downspots, and few other repairs and updates.
I have been toying around with the idea of making more videos that may or may not drive some more traffic to the blog (and at the same time motivate me to make more updates to the blog) I don’t have a lot of skill with video producing and don’t have a lot of video equipment, so they won’t be by any means high quality. A couple video thoughts I have had is the process for making the tambor door I will be taking for the breadbox and the re-installation of the Micro Jig splitter on my TS. If this is something you would like to see, please post some feedback in the comments section of this post, as the feedback I get will influence how and when I post a video.

