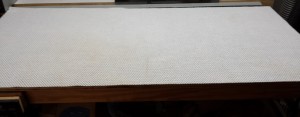
 I picked this shop tip up from my good friend and fellow woodworker Roger T. My primary bench is used for everything in my shop, including my table saw’s out feed table. As a result the surface gets rough from glue splotches, divots, chips, and so on. If I am not careful, I have been known to sand one side of work piece, flip it over, sand the other, then inspect both sides to find a freshly sanded face now has a scratch or bruise and now requires more sanding. While I do run a sander over the top occasionally, that doesn’t always help. An expensive solution is to get a role of the drawer liner that is essentially a foam rubber mesh. I bought a 2’x6′ role from the local big box store for a little over $6. My bench is right around 2’x 4′. I rolled
 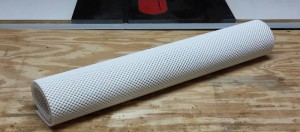 it out so that it covers my enter bench and then using a straight edge and utility knife I cut it to length. There is no need to use anything to attach the liner to the bench top as it lays flat on its own. When I am done sanding, I simply roll up the liner and put some place out-of-the-way.
Router Table – Wrap Up
Published on by Mike (2 Comments)
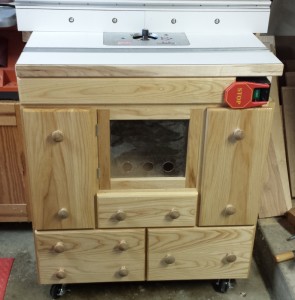 Wow! This turned out to be the biggest and most complex project I have completed yet in my wood shop. And I would do it again in a heart beat! I looked back on my first post for the router table, where I had defined the goals I wanted to achieve for the new table. I am happy to say I have achieved them all! The router table truly is a joy to use!
A couple quick things I wanted to highlight that I didn’t cover in previous posts. The first is the drawer pulls. ![]() I ended up turning all the pulls for the drawers. Each drawer has two pulls on it, and there are 6 drawers. If you ever want to good practice and replicating parts on a lathe, turn 12 pulls! There was some variation between each one, but over all they were each a good match with the rest. The other item I wanted to mention is the bit storage. For now I kept it simple just by taking a length of plywood, drill a bunch of 1/2″ and 1/4″ holes, and screwed it to one of the vertical drawers. With the setup I came up with for bit storage I will be able to change and rearrange it as my bit collection continues to evolve.
I ended up turning all the pulls for the drawers. Each drawer has two pulls on it, and there are 6 drawers. If you ever want to good practice and replicating parts on a lathe, turn 12 pulls! There was some variation between each one, but over all they were each a good match with the rest. The other item I wanted to mention is the bit storage. For now I kept it simple just by taking a length of plywood, drill a bunch of 1/2″ and 1/4″ holes, and screwed it to one of the vertical drawers. With the setup I came up with for bit storage I will be able to change and rearrange it as my bit collection continues to evolve.
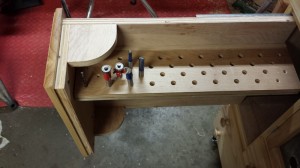 A quick note about the vertical drawers. I took a small risk and tried something different and unique with them. As of this post, I have actually been using the table for a couple of months, and I can honestly say I love the configuration. One drawer is designated for wrenches, collets, height adjuster, and various other components I use frequently. The other is for bit storage. Both provide very easy access to getting what I need, while keeping everything very organized.
Thank you all for following along! On to the next project!
Router Table – The Fence and Dust Collection
Published on by Mike (Leave a comment)
T he fence from the old table was another area of the router table that had some room for improvement. Overall the new fence is mostly a bigger version of the old one, with a sliding split front that I can have an opening that is sized to the bit being used, with a length of t-track for attaching feather boards, stops, and a guard. The big improvements I made are how the fence attaches and clamps down to the table, and the dust collection. On the old table I routed a couple grooves that a couple of carriage bolts would travel in. Those bolts went through a couple of holes the base of the fence with a couple of wing nuts to lock it in place. This worked fine, but what I didn’t like about it is that I had to completely disassemble them to remove the fence from the table.
 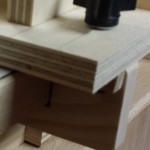 I have observed several fence designs where the fence extends over the table on either side and then uses wood blocks to clamp the fence to the table. While it was a bit of a trial and error process, this is the design I went with. What I found is the clamp blocks work best when the wood clamp blocks slightly engage the bottom of the table. The top of the block is tapered just a bit so that it will cause the block to pull up evenly to the bottom of the table, resulting in a very strong fit, as well as releasing cleanly.
 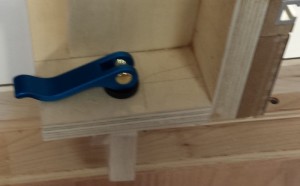 The first iterations when I loosened the knob, the clamp blocks remained engaged. Once I finally got the clamps working as needed I switched out the knobs with cam levers from Rockler, which work very well to quickly lock and unlock the fence.
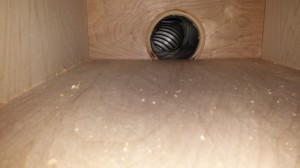
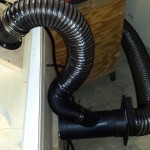 One of the top priorities for a new router table was dust collection. The router table has always been a big source of shavings and dust. The dust collection for the router table is done in two parts, divided between the space under the router table that contains the router and lift, and the fence. To accomplish this, I got a 4″ Y fitting where one of the forks is reduced to 2.5″. Using a scrap piece of hardwood, I marked the perimeter of the Y, that I then cut out the hole using the band saw and the oscillating spindle sander to get a good fit. Since I kept the back of the router table removable, I marked approximately where I wanted the DC to go in, and took off the back. I then used the piece I just made to mark precisely where the dust collection would go in. I cut out the opening with a jig saw. From there I double side taped the reference piece to the back, and used a flush trim bit on the router to get the opening properly sized and shaped. On the inside portion I ran a chamfer around the perimeter of the hole as well, which should help the flow a bit. While the back was off, I decided I didn’t want to glue the fitting to the back directly so that I could make tweaks as needed, so I lined up the scrap piece I had made to the hole and screwed it in place where I then glued the Y to it with Gorilla Glue. The foaming did very well to close up any gaps.
  While the glue dried, I turned my attention to the fence. I bought a 2.5″ connector that would attach to a piece in the back of the fence. I used the jig saw on a square piece to get the approximate hole I needed. With the connector attached, I used the flush trim bit on the router table to get the hole sized perfectly. I then made a couple triangular wedges that I attached to the back of the fence, and then attached the connector piece. Once the glue dried on the Y, I cleaned up any excess foam and attached it to the back of the router table. I then took the 2.5″ hose, pushed the fence as far forward as I would ever need it to determine the length, and cut the hose to length, a little longer than needed. Using hose clamps I attached the hose to the fence and to the Y. On the open end of the Y, and blast gate was attached, that was then tied into my dust collection system. With that, I made sure all the other blast gates, opened up the one on the router table, lined up the fence close to the bit, and power up the dust collector. I could feel plenty of air moving through the table, so I made a few passes with a round over bit. I am happy to say the dust collection works very well both on top of the table at the fence, and below the table!
I am going to have one more post on the router table, where I will cover the drawer pulls, finish, and some finishing touches.
Router Table – The Drawers & Door
Published on by Mike (Leave a comment)
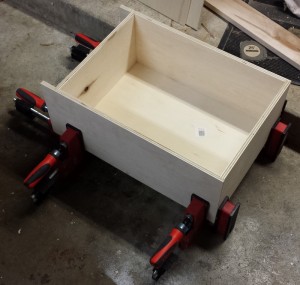 One of my requirements for a new router table was a cabinet that had plenty of storage. So I designed it with 4 traditional drawers and 2 vertical drawers. The traditional drawers are basic plywood boxes, with an applied hardwood front. The boxes were assembled using rabbets and dados. There is a groove in the bottom to accept a 1/4″ thick piece of plywood for the bottom. The drawer boxes are sized so that they slide in and out of the cabinet easily. The backs of the drawers are inset a couple inches so that they can slide out enough that I am able to get full access to the drawer contents, but it won’t fall out of the cabinet.
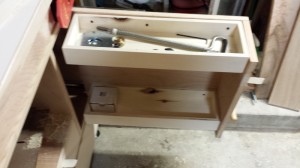 The vertical drawers are something unique I came up with, that will hopefully give me a greater amount of flexibility on my storage needs. The concept is very similar to what I did for the hand tool cabinet. The main panel is a 3/4″ thick piece of plywood attached to the sides of the cabinet with full extension drawer slides. A front is attached with brackets and pocket screws. The right vertical drawer I have a couple shallow boxes attached to it that stores everything I need for bit changes and adjustment. This has proven to be very useful. Currently the left vertical drawer is empty, but I plan to use this mainly for bit storage.
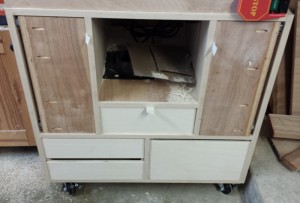 The fronts of the drawers are made from ash. The fronts for the bottom 3 drawers were made from one panel of wood so that I can get a good grain match. I also attempted to make the 2 smaller drawers look like they are one piece, though it is two. Attaching the drawer fronts turned out to be straight forward. Since I am turning the pulls on the lathe, I figured I could use that to my advantage. I measured out and predrilled screw holes with a fairly deep counter sink. I then put screws in enough that I could push them against the draw box. Once I was satisfied with the alignment I screwed the screws home. I then put it four more screws from behind to get a solid fit. For the space directly under the router table, the front was a piece of plywood which looked out of place next to all the ash. So I made a false front in the same style of the drawers.
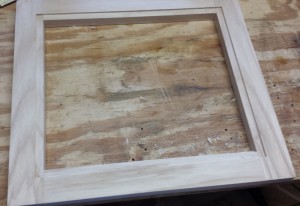 The door is similar to a frame and panel door, except that instead of a wood panel, it is using a plexiglass insert. I didn’t want to run a groove all the way around, so I used the router tablento put mortise on each end of the 2 stiles. I did this on the router table with a 1/4″ bit. Using a rabbet bit I made the tenons on the rails. I then glued up the frame. Using the same rabbet bit, I put a rabbet all the way around the back of the inside portion of the frame which is deep enough to accept the plexiglass and push pins to hold it in place. After routing out the rabbet, I used a couple chisels to square the corners. On the front, again inside the frame, I routed a round over. Using my rasp and some sand paper I cleaned up the corners. The plexiglass panel has holes drilled into it for back flow for the dust collection.
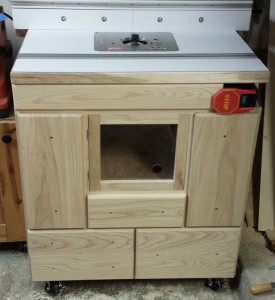 All that is left is the pulls. They aren’t done yet, and will likely be the last thing I do for the router table. If I don’t get them done before the final post on the router table, I will post a picture of them in a future general update post. Otherwise, from the front the router table looks complete visually. However, there is still a bit more to go on the build, which I will go over in the next post.
Woodshop Going-ons
Published on by Mike (Leave a comment)
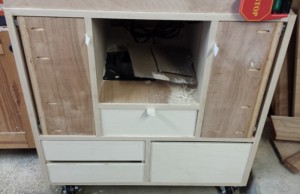 It seems like this time of year my postings tend to drop off, though it is always for a good reason. Rather than spending time typing a post, I am out in the woodshop working!! The last couple weekends, as I have got time, I have worked on the drawer boxes for the new router table. While the boxes are all done and in place, I still have some work to do on them, mainly making the fronts for them. Once those are done, I will do a follow-up post of what went into making the drawers. The good news is the router table is useable, and it really is a joy to use. It is hard to believe that the same router is in this one that was in the old one. The bigger work area is definitely a bonus. Also, because of the increased overall weight, there is virtually no vibration. I am really looking forward to getting the drawers done so I can start to really utilize the storage features of the cabinet.
 Two quick tool gloats. Back in April, I went to the Lie-Nielsen tool event host at the Popular Woodworking Magazine headquarters near Cincinnati Ohio. I had a great time there, but also picked up their new tapered cross-cut saw. I have used it a couple of times to help lay out some short dados, and it is a great saw. While I was at the tool event I tried out their new tapered dovetail saw. I did not buy it yet as I have the Veritas saw, but I can tell you , Lie-Nielsen has a winner there! This may be a future purchase for me. I have also been wanting to update my jack plane, as the one I have is not well made Stanley Handyman. I tried out the #62 while I was there, and I am seriously considering that as the replacement for the jack plane.
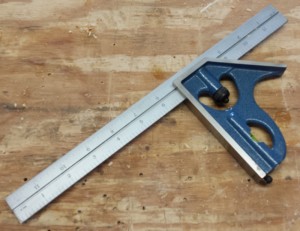 Last weekend I also swung by Gerstner’s yearly warehouse sale. While they had a real nice discount on most of the stuff there, one of their tool chests is unfortunately outside my budget. I will say this though, they are beautifully made chests. Maybe some day! 🙂 I didn’t leave empty-handed though. They at want time sold rebranded PEC squares and they were closing them out for a very low-cost. So I picked up a nice, and much-needed, 12″ combination square.
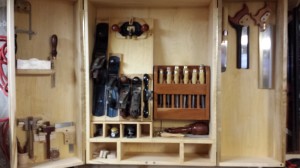 Finally, I did some shop maintenance as well. First I rearranged a few things in the hand tool cabinet so it can better accommodate my now growing collection of hand saws. I actually started using the second door, and moved my hand saws over to it. I still need to make the drawers for cabinet though. One of these days!
